
K8s security - Episode 6: Security Cheat Sheet
You will find here a security cheat sheet with the simple purpose of listing best practices and advice to protect your production environment when running it on a Kubernetes cluster.

We will be starting our journey in the Cloud, securing a Kubernetes cluster and all its layers. Speaking of layers, we like to think that Kubernetes is similar to an onion where one layer of abstraction always hides the next one. Each of these layers can be secured in various ways.
This article is an overview of security objects and practices that everyone should be aware of. Knowing that all these layers of security exist, what they are called, and what they are for, is already a first big step into securing a Kubernetes cluster.
Trying to apply all these concepts at once would be overwhelming and discouraging. Instead, we suggest that you take the information you need for your use cases, and just keep following this series of articles through to the end. Once you have a full overview from the Cloud to your code, it will be easier to come back to this article and sharpen your understanding of these concepts if need be.

The Kubernetes architecture that we describe below has been voluntarily simplified. Our goal is to understand what needs to be secured and, most importantly, how.
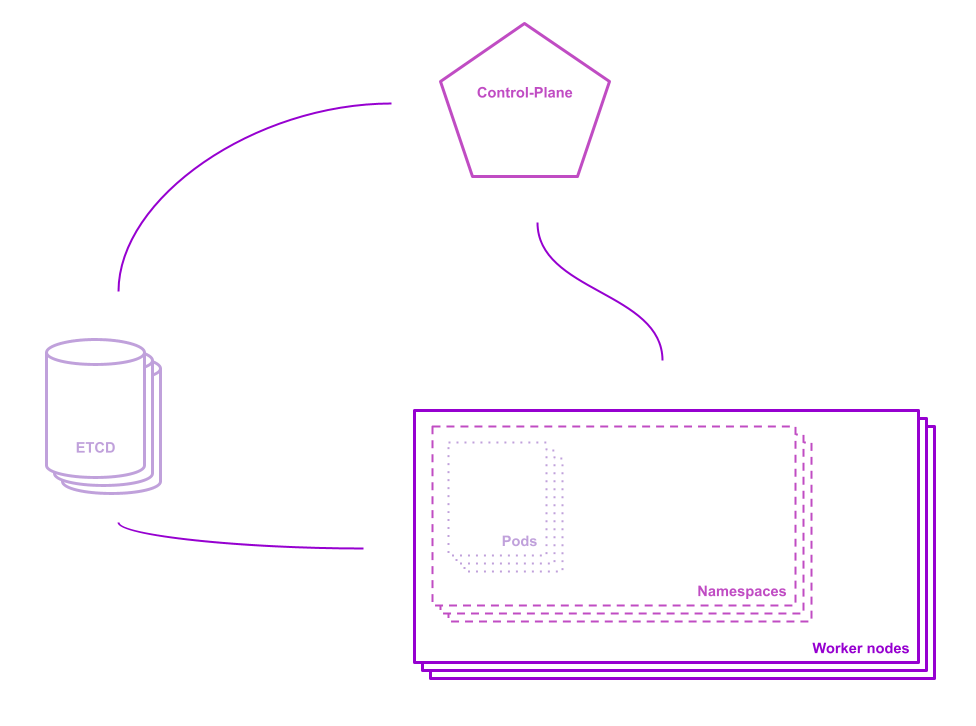
What is a Kubernetes cluster made of?
For simplification purposes, we will consider a simple Kubernetes cluster and its main components:
When triggering an action in a cluster `kubectl`, the user reaches its Control Plane. Users do not access their worker nodes directly, as the cluster services are considered managed. As a result, all `handmade` instructions on a Kubernetes cluster can potentially be overridden.

In terms of security issues, you can either manage your cluster yourself or choose a managed Kubernetes engine. No matter what you decide, each cloud provider can manage cluster security according to their own standards. Bear in mind also that you might have no information about the default security layers installed at cluster creation.
It is highly recommended to be careful and not trust what you don't see. When using a cloud provider, your first step should be to check their default properties, such as Admission Controllers. If you choose to go on a Kubernetes journey by yourself, Admission Controllers are surely one of the first padlocks you should think about.
When sending an instruction to a Kubernetes cluster, you are calling an API server, instructing your control plane. Configurations are then applied to the worker nodes.
It is crucial to keep in mind that at any moment, your Kubernetes cluster can auto-heal, replacing or restarting non-responding worker nodes. It can also scale up and down in terms of pods and nodes. This means that Kubernetes worker nodes are stateless and should remain so, at all times.
Accessing a worker node without using the control plane would mean that you apply a configuration manually on a worker node, considering it stateful (which it isn't). It would represent a risk of data loss, configuration loss, or configuration override. Also, you might spend a useless amount of time trying to fix or understand how it happened.
Scaleway's Kubernetes Kapsule does not allow you to access your worker nodes using `ssh`, specifically so as to avoid this kind of behavior.
If you are building your own Kubernetes cluster and managing it yourself, it is highly recommended that you implement the same behavior, allowing worker nodes access for necessary administration but rejecting it for any non-admin user.
At the heart of your cluster, your control plane should be loved, cherished, and protected.
If you are using a managed Kubernetes engine, there is very little probability that you can access it any other way than using the API Server. If you are not using this access method, you must make sure only administrators have access to the servers themselves and that k8s users only have access to the API Server. Each cluster should aim to have its own certificate for accessing it.
When choosing your Cloud Provider for a managed Kubernetes engine, or looking at the best way to manage your certificates yourself, there are a few interesting things to think about while making your decision:
Imagine a CI/CD manages your deployments. Do developers need to access the cluster? Usually, the answer is "probably not." Then certificate access can be restricted to the CI/CD tools and administrators managing the cluster.
If your certificate has leaked for some unknown reason, how can you renew it? Or, if a company administrator leaves, how can you revoke his cluster access?

On a Kubernetes cluster level, there are at least three main layers to secure:
Once you have deployed containers, applications, services, and more in your cluster, it is nearly impossible to manage all the security layers.
As all your pods and services might not be deployed simultaneously or with similar configurations, one application could work just fine until a worker node is replaced and your container cannot be pulled back.

Admission controllers control requests accessing the API Server. They will grant or deny access to the cluster workers. They can limit creation, deletion, modification, or even connection.
By setting admission controllers on your cluster, you define the behavior of every Kubernetes object running onto it. It defines security strategies to apply, regardless of pods or containers.
There are many different admission controllers, and we encourage you to visit the official Kubernetes documentation if you want to go into more detail and find out what other restrictions you can set at cluster level. The eight admission controllers chosen here are easy to understand:
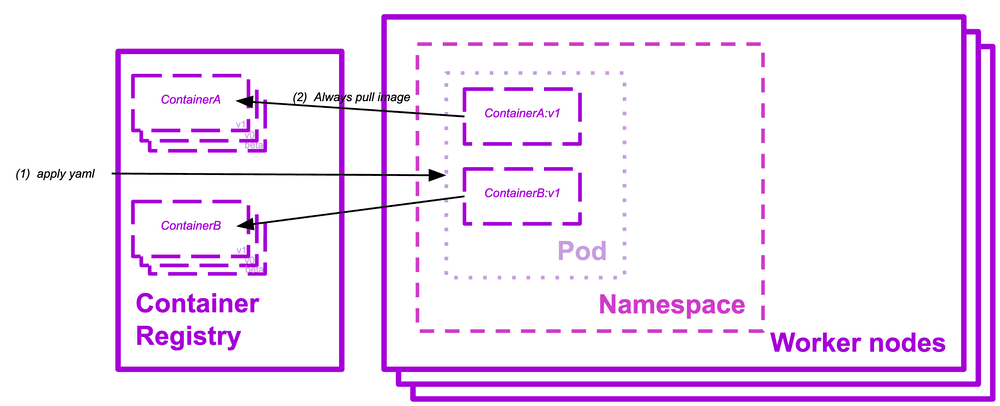
AlwaysPullImages
Setting the default policy of every new pod ensures that your services always use the last version of the container you are pulling. It also implies that only users with permission to do so can fetch containers.
DefaultStorageClass
This admission controller is always set by Cloud providers, as it defines the type of PersistentVolumeClaim objects that will be used by default in your cluster. This ensures that Block Storages or File System Storages created within a Kubernetes cluster will create the corresponding resources on the same provider.
LimitRanger
Using LimitRanger allows the defining of constraints on Kubernetes namespaces, such as the CPU resources used by a pod.
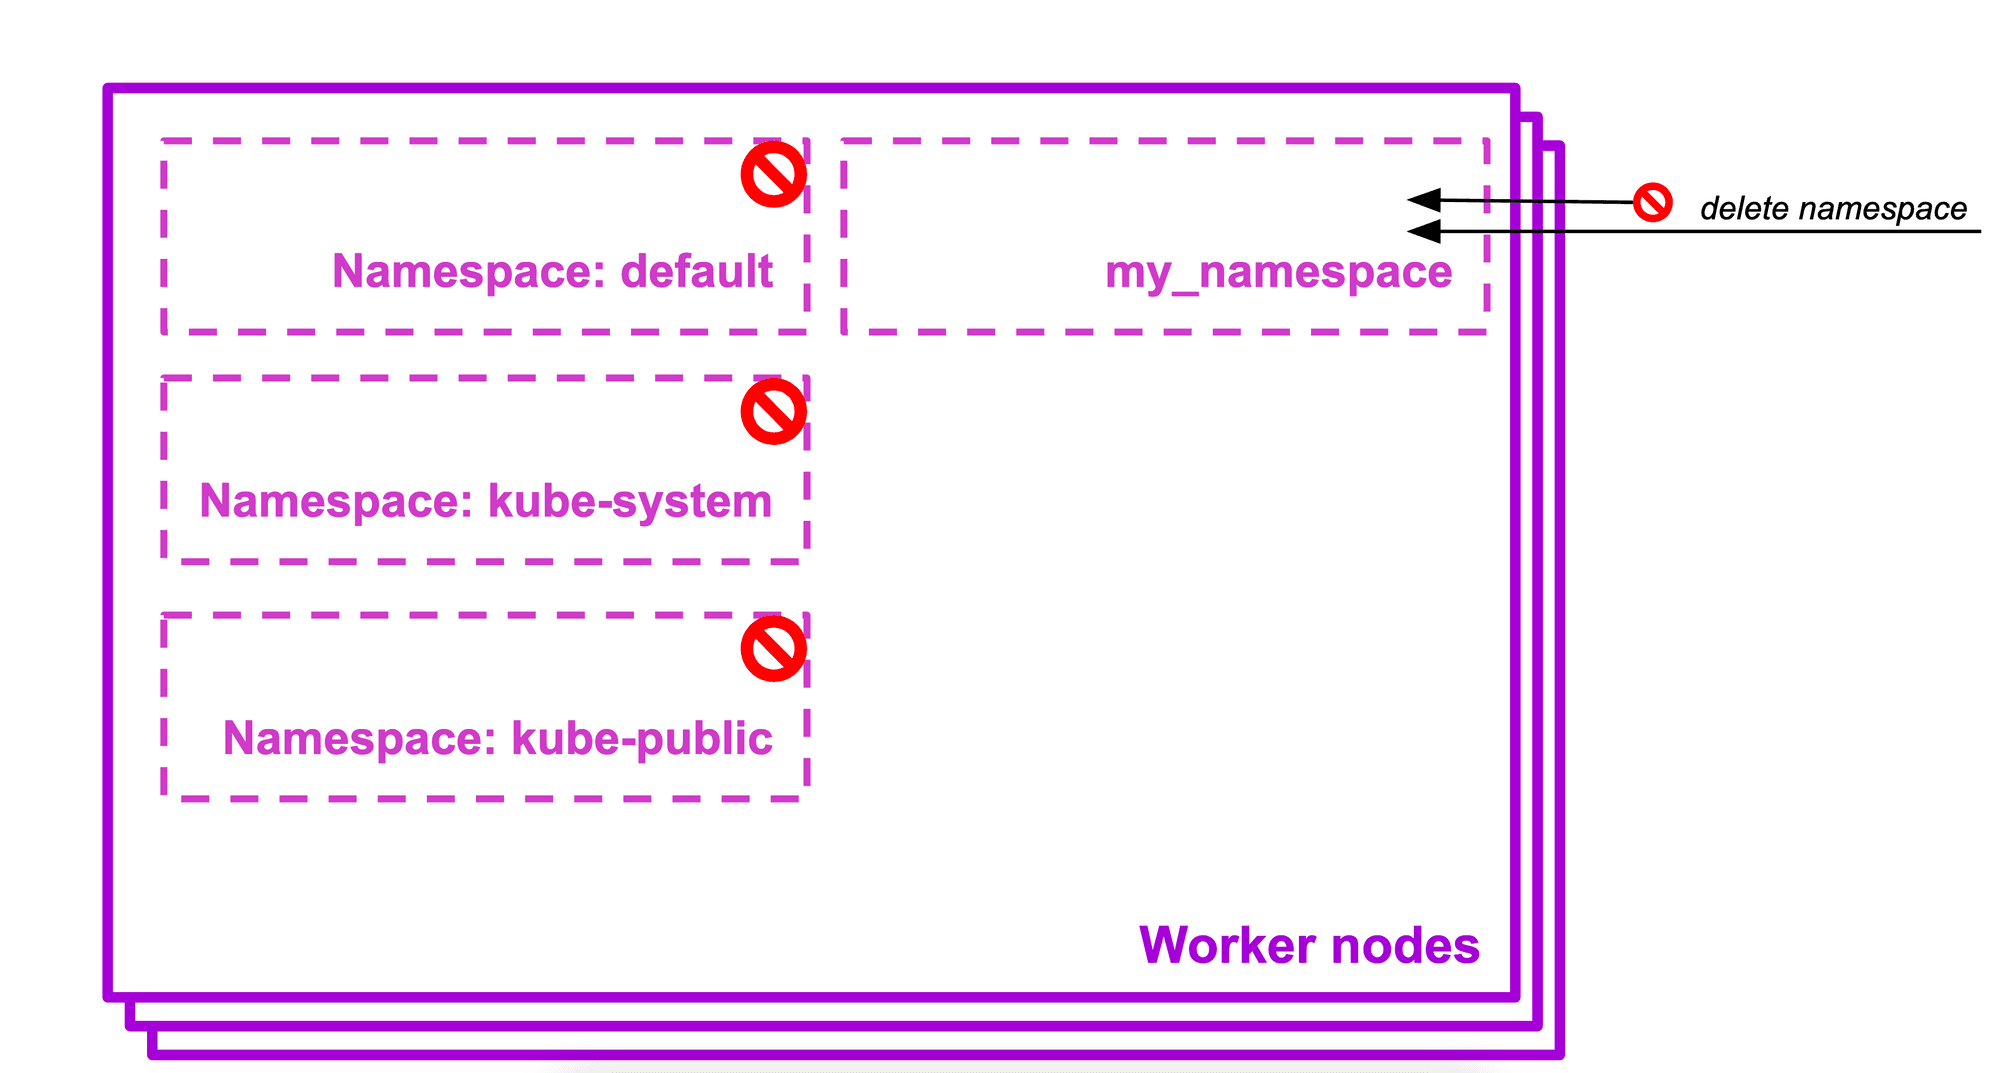
NamespaceLifecycle
This admission controller is set by default in managed Kubernetes engines as it prevents deletion of system reserved namespace (default, kube-system, kube-public). It ensures that a namespace undergoing termination does not allow new objects to be created in it.
NodeRestriction
Limiting node and pod objects that can be modified by a kubelet, forcing credentials to be set if the kubelet is required for modification. It ensures the kubelet has only the minimum set of permissions to operate correctly.
PodSecurityPolicy
The pod security policy feature is deprecated since Kubernetes 1.21. From Kubernetes 1.25 onwards, this feature will be removed. We decided to keep this information at our reader's disposal as this series of articles aims to help readers understand and address security issue
This admission controller is very restrictive but efficient. It needs to be used with PodSecurityPolicies at the pod level (this will be covered in more details later in this article). It determines if the creation or modification of a pod is allowed or not, depending on the pod security policy.
ServiceAccount
Allowing precise user management within a Kubernetes cluster requires that the ServiceAccount admission controller be set. It is mandatory if you want to create ServiceAccount k8s objects in your cluster (for user group access authorization, for instance).
ResourceQuota
You can define ResourceQuota objects in a namespace to set constraints on the resources used by applications and services running in it. This admission controller is very interesting if you have multiple types of services accessing the same cluster, but each with different namespaces. You can then restrict resources for a namespace, thus ensuring that a minor service will not take up more resources than your main service.
As we go through this list, we might feel like there is a lot to think about before even starting to code our applications. We can begin to realize that security does not depend only on your infrastructure but also on how your applications are designed.

Today, the cloud-readiness of your applications and services is key. Taking a step back to the code and to the architecture, we realize that we need to think about the people and external services that will use or connect to our cluster. It is also a matter of interaction, thinking about how pods can interact together, or even if they should.
Pod interaction
Pods are non-isolated by default, meaning that they accept traffic from any source; from outside to the pod (ingress rules), and from the pod to the outside (egress rules).
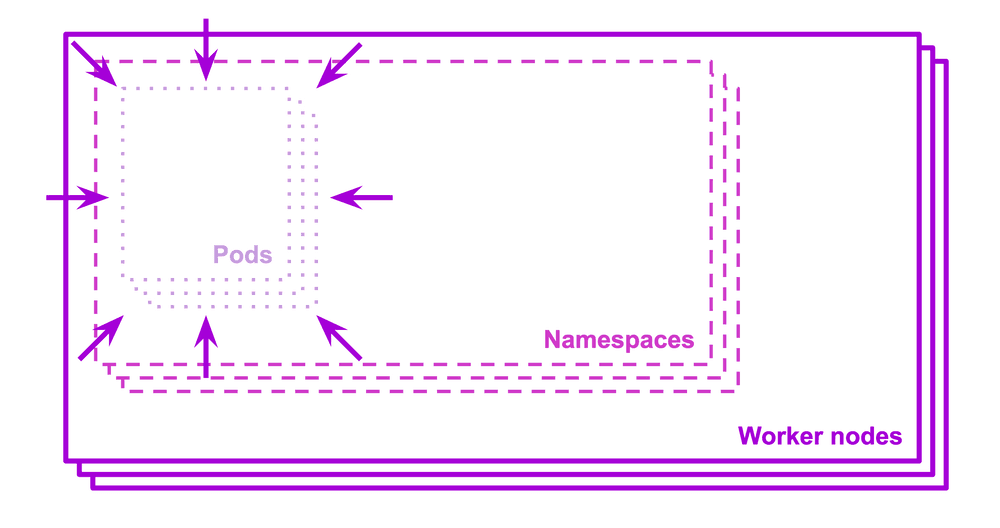
Pods can be isolated by setting a NetworkPolicy that selects them. Once there is a NetworkPolicy in a namespace, a selected pod will reject any connections that are not allowed by that NetworkPolicy. On the contrary, other pods in the namespace will continue to accept all traffic if they are not selected by the same NetworkPolicy.
Network policies have the advantage of not conflicting with each other, meaning that you can set multiple policies selecting the same pod, and they will both apply, combining their ingress and egress rules.
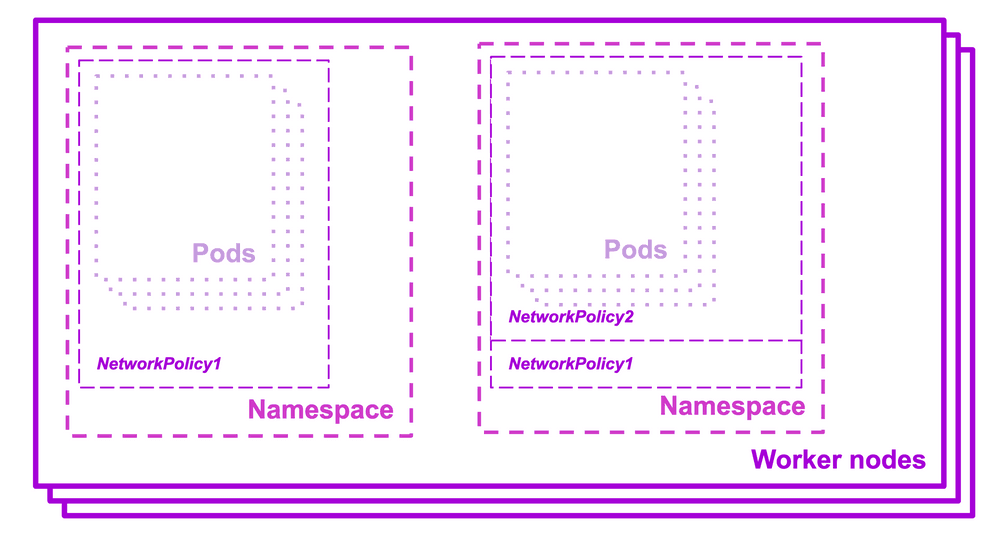

Pods are running our application, and we often forget about the security layer we can directly apply on namespaces. While wanting to secure an unprotected architecture already in production, the best way to start is probably by isolating the namespace.
First, controlling the resource usage allowed by each namespace, ensuring a data pipeline service does not take resources needed by a core feature; or avoiding node autoscaling based on the namespace (because of the type of service running in it).
Secondly, using RoleBasedAccessControl (RBAC). RBAC usage is standard and straightforward and can be set progressively, one user group after the other. Thus your namespaces and the services running on them are progressively isolated, and external users are prevented from having access to objects they should not see.
Pod security policy (deprecated)

Pod security policies allow you to define rules in order to accept or reject the creation of pods. The cluster administrators can then decide what should or should not run in the Kubernetes cluster. For instance, you could deny all pods running as root or that run in privileged mode.
This object requires the associated admission controller to be set at the cluster level. It is a layer of security directly on the pod level and is highly recommended. However, it needs to be used carefully because as soon as the admission controller is set, no pod will be authorized for creation in the cluster until a pod security policy is set to authorize it.
If you want to implement pod security policy on a running Kubernetes cluster, one solution can be to create a policy without restrictions and then to add new policies and constraints one after the other. In addition, PodSecurityPolicy resources should be used in complement to ServiceAccount and RBAC.
The most difficult topics are dealt with in this article. Again, the purpose of this series is to make it understandable and demystify Kubernetes' security matters and solutions. So while this might look like a lot of information to absorb, it's important to remember that everything can be treated step by step, slowly adding restrictions and security layers. There's no need to rush into trying to do everything at once.

You will find here a security cheat sheet with the simple purpose of listing best practices and advice to protect your production environment when running it on a Kubernetes cluster.

Along with user accesses, you also need to control what is being authorized by the services you did not create yourself, and that you depend on: third parties.

This article overviews security objects & practices that everyone should know: all these layers of security, what they are called, and what they are used for to secure your cluster.