Site-to-Site VPN - Quickstart
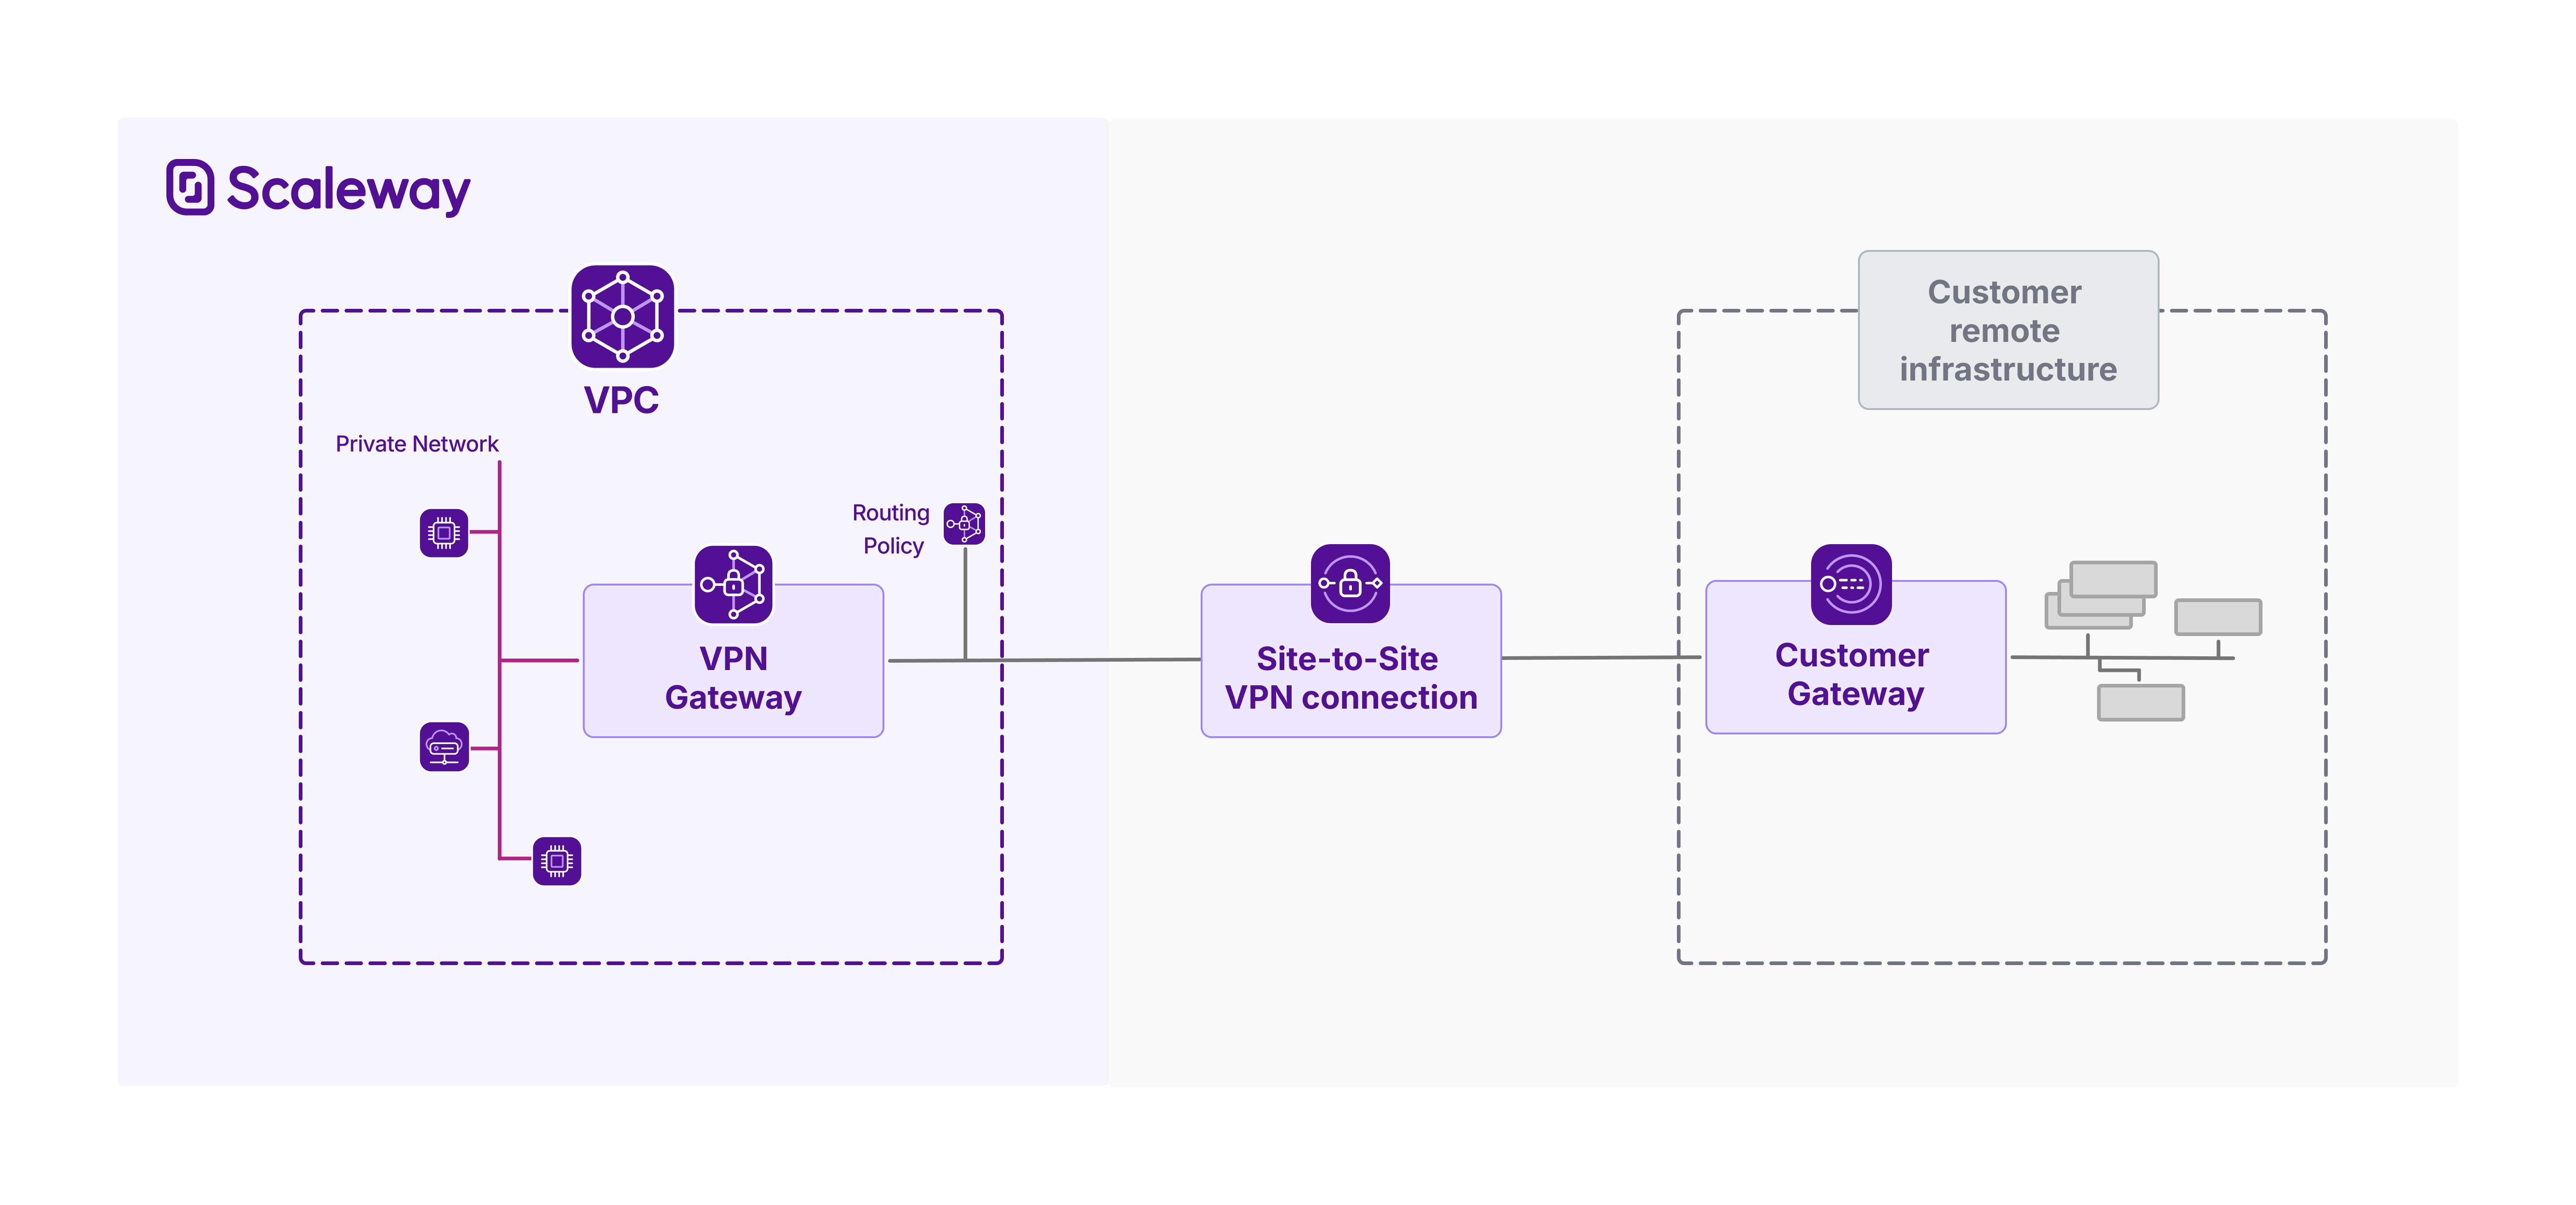
Site-to-Site VPN lets you securely connect your Scaleway VPC to your remote infrastructure, enabling encrypted data exchange over a private VPN tunnel. Integrated with VPC routing, traffic destined for your remote infrastructure can reach it from your VPC via the secure VPN tunnel, and vice versa. Site-to-Site VPN connections are secured with Internet Protocol security (IPsec).
Scaleway Site-to-Site VPN consists of:
- A VPN gateway: the connection point on the Scaleway side
- A customer gateway the connection point on the remote side (representing a corresponding physical customer gateway device)
- A routing policy: defines the traffic allowed to flow through the tunnel
- A connection: brings together the three above elements, and defines the encryption and configuration for the VPN tunnel
You must create all of the above elements, and correctly configure your customer gateway device, for a functional Site-to-Site VPN.
This document walks you through the process to create a Site-to-Site VPN in the console.
Before you start
To complete the actions presented below, you must have:
- A Scaleway account logged into the console
- Owner status or IAM permissions allowing you to perform actions in the intended Organization
How to create a VPN gateway
Creating a VPN gateway is the first step in creating a Site-to-Site VPN.
-
Click Site-to-Site VPN in the Network section of the Scaleway console side menu.
-
Click the VPN gateways tab, then Create VPN gateway. The creation wizard displays.
-
Choose a region in which to create your VPN gateway. The resource will be created in this geographical location. VPN gateways must be in the same region as the resources (customer gateways, connections etc.) that you link them with to create a Site-to-Site VPN tunnel.
-
Choose a zone (optional) if you want to pinpoint exactly where in the region your gateway should be created.
-
Choose a gateway type, based on bandwidth and how many connections the gateway should be able to support.
-
Configure network connectivity for the VPN gateway.
- Attach to Private Network: You must select a Private Network which the VPN gateway will connect to. This is not currently modifiable after gateway creation.
You can choose either to auto-allocate the gateway's private IPv4 and IPv6 addresses on the Private Network, or select specific private IPs. You must have already reserved these IPs via IPAM. - Set up public connectivity: Assign a public IPv4 or IPv6 address to your gateway. This will be used to establish the VPN tunnel. If you want to be able to create two connections between this gateway and a single customer gateway (for dual tunnels), you must also assign a second IP address, of the IP type not used for the first address.
- Attach to Private Network: You must select a Private Network which the VPN gateway will connect to. This is not currently modifiable after gateway creation.
-
Enter a name and (optionally) tags for the VPN gateway.
-
Click Create VPN gateway to finish.
Your gateway is created, and you are directed to its Overview page.
How to create a customer gateway
The next step in creating a Site-to-Site VPN is creating a customer gateway.
-
Click Site-to-Site VPN in the Network section of the Scaleway console side menu. A listing of your VPN connections displays.
-
Click the Customer gateways tab, then Create Customer gateway. The creation wizard displays.
-
Choose a region in which to create your customer gateway. The resource will be created in this geographical location. Customer gateways must be in the same region as the resources (VPN gateways, connections etc.) that you link them with to create a Site-to-Site VPN tunnel.
-
Define connectivity parameters, to supply Scaleway with essential details of your remote customer gateway device:
- IP address: Provide the public IP address(es) of your customer gateway device, used to establish the VPN tunnel. If you want to be able to create two connections between this gateway and a single VPN gateway (for dual tunnels, increasing redundancy), provide an address for each IP type.
- ASN: Provide the unique identifier assigned to the customer's network, used by BGP (Border Gateway Protocol) to exchange routing information with other networks.
-
Enter a name and (optionally) tags for the customer gateway.
-
Click Create customer gateway to finish.
Your gateway is created, and you are directed to its Overview page.
How to configure a customer gateway device
Your customer gateway device is a real physical or software-based networking device, located on the remote network you want to connect to your Scaleway VPC. The customer gateway that you create in Scaleway is a logical representation of this device.
Creating the customer gateway on the Scaleway side does not automatically configure the corresponding physical or virtual device. This must be set up separately by you or your network administrator to establish the Site-to-Site VPN connection.
See our dedicated page for advice on configuring your customer gateway device.
To continue setting up a Site-to-Site VPN, create a routing policy or create a connection.
How to create a routing policy
After creating a VPN gateway and a customer gateway, you can choose to either create a routing policy, or skip this step for now and create a VPN connection. If you do not create a routing policy at this stage, you must create one later, and attach it to your VPN connection, otherwise no traffic will be able to flow.
Find out more about routing policies.
-
Click Site-to-Site VPN in the Network section of the Scaleway console side menu. A listing of your VPN connections displays.
-
Click the Routing policies tab, then Create routing policy. The creation wizard displays.
-
Choose a region for the policy. It can only be attached to VPN connections within the same region.
-
Define the type of IP traffic to be covered by the routing policy.
-
Whitelist the outgoing routes to allow. For each entry:
-
Enter an IP prefix to define a range of route announcements to whitelist, e.g.
172.16.4.0/22. -
Click Add when complete.
-
-
Whitelist the incoming routes to allow, in the same way you did for outgoing routes. Outgoing routes concern announcements to accept from the remote infrastructure. Traffic can be routed through the VPN tunnel from your Scaleway VPN gateway to your remote infrastructure along these routes.
-
Enter a name for the policy, or leave the randomly-generated name in place. Optionally, you can also add tags.
-
Click Create routing policy.
The policy is created, and you are returned to the listing of your routing policies.
How to create a VPN connection
A connection is the central component of a Site-to-Site VPN. It links the VPN gateway to the customer gateway, sets the routing policy(ies), and defines the encryption, initiation and security parameters for the VPN tunnel.
-
Click Site-to-Site VPN in the Network section of the Scaleway console side menu. A listing of your existing VPN connections displays, if you have any.
-
Click Create connection. The creation wizard displays.
-
Choose a region in which to create your VPN connection. The resource will be created in this geographical location. You must create the connection in the same region as the VPN gateway and customer gateway that you want to connect.
-
Choose the gateways to connect. The connection will link the VPN gateway and customer gateways that you select here. Only gateways you have already created in the region you chose at step 3 will be displayed.
Based on the selected gateways, the VPN tunnel details selection panel displays.
-
Select how the VPN tunnel for this connection should be established: via the gateways' public IPv4 addresses or their public IPv6 addresses.
-
Specify a routing policy for the connection, (optional). The VPN connection needs a policy for each IP traffic type (IPv4, IPv6) you want it to route. These policies define the traffic that is allowed to flow through the tunnel. Without an attached routing policy, no traffic can flow, but you can choose to attach a routing policy after creating the connection, if you prefer.
-
Set the connection initiation policy by selecting which gateway should initiate the VPN tunnel.
-
Select a security proposal for this connection. The security proposal defines the encryption and authentication methods used to secure the IPSec VPN tunnel. For help choosing a security proposal, refer to our dedicated documentation.
A pre-shared key (PSK) will be generated automatically when you create the VPN connection object. It will be securely stored in Scaleway Secret Manager, and can be retrieved for the purposes of configuring your customer gateway device. It is not currently possible to upload your own custom PSK.
-
Enter a name and (optionally) tags for the VPN connection.
-
Click Create connection to finish.
Your connection is created, and you are directed to its Overview page.
How to activate or deactivate route propagation
You must activate route propagation for traffic to be able to flow through the VPN tunnel. Activating route propagation triggers the dynamic exchange of route information between the gateways.
-
Click Site-to-Site VPN in the Network section of the Scaleway console side menu. A listing of your VPN connections displays.
-
Use the region selector at the top of the page to filter for the region of the connection you want to view, then click the connection in the listing. The connection's Overview page displays.
-
In the Route propagation section, click Activate propagation.
A pop-up displays, confirming that the action will launch the BGP session(s), allowing traffic to flow through the tunnel via the routes whitelisted in the attached routing policy(ies).
-
Click Activate route propagation.
Route propagation is activated. You are returned to your connection's overview page.
While route propagation remains active, the two gateways will dynamically exchange and update route information. Traffic can flow through the VPN tunnel along the routes whitelisted in the routing policy(ies). You can deactivate route propagation at any time: if you do so, all routes are blocked and no traffic can flow.
Troubleshooting
If the tunnel does not come up as expected, ensure you have completed all the essential configuration steps.